Build an 'ID Stamp' in Photoshop to Watermark Your Photographs
One's ability in Lightroom now, to add a 'watermark' to images that are part of a web gallery or slideshow, is a wonderful improvement over earlier versions of the software.
We can choose to utilize any font that is available for use on the computers we run Lightroom on to make a 'Styled Text' watermark; or, as an option, we can create a graphic in Photoshop to import and use as a watermark instead.

The Watermark Editor in Lightroom 3
However, with all the options available affecting the visual interplay between image and watermark-overlay, it's a one-size-fits-all solution that rarely works in a presentation unless all the images are nearly identical – like a series of head-shots with the subject essentially in the same place all the way through.
How we decide to 'anchor' the watermark, the opacity and size of our overlay will all be the same with each and every image in our presentation. (SEE this example web gallery.)
So what to do?
First off, if you are making a Flash Gallery you don't need to watermark your images. While it is not impossible for someone to swipe an image from a Flash movie (which is how your image gallery will be rendered when you select a 'Flash Gallery' option) it's just more a pain in the backside than most people are willing to put into ripping someone else's images. So don't bother. Watermarks tend to be a distraction anyway.
Same goes for a slideshow. Most people are going to want to export their effort as an mp4 movie file to maintain the wonderful fade transitions one can build into the slideshow presentations Lightroom builds.
If one intends to export a slideshow as a PDF for, say, a portfolio presentation they would like to add to their iPad or similar tablet then O.K., perhaps it might make sense to overlay a subtle watermark. But again, we are dealing with this godforsaken 'global' solution when we render a series together. The watermark overlays each and every image in the same place, at the same opacity you decide upon when selecting this option for your slideshow!
There has to be a better way!
There is; but the solution does take a bit more effort on our part, something I'll bet Adobe is trying to help its Lightroom users avoid if at all possible. After all, their intent has been – and I think they have pretty-well succeeded – in helping the vast majority of photographers take care of nearly every task they may encounter in their workflow by way of simple, logical and mostly 'global' (or all-encompassing) settings and effects.
Consider this process instead:
1) Select the images you want to use in your web gallery. To export them all at a time press Command (Mac) or Control (PC) + the 'A' key.
2) With all your images selected drop down from the 'File' menu to 'Export' (or employ the Command (Mac)/Control (PC) + Shift + E keyboard shortcut) to access the Export dialog.
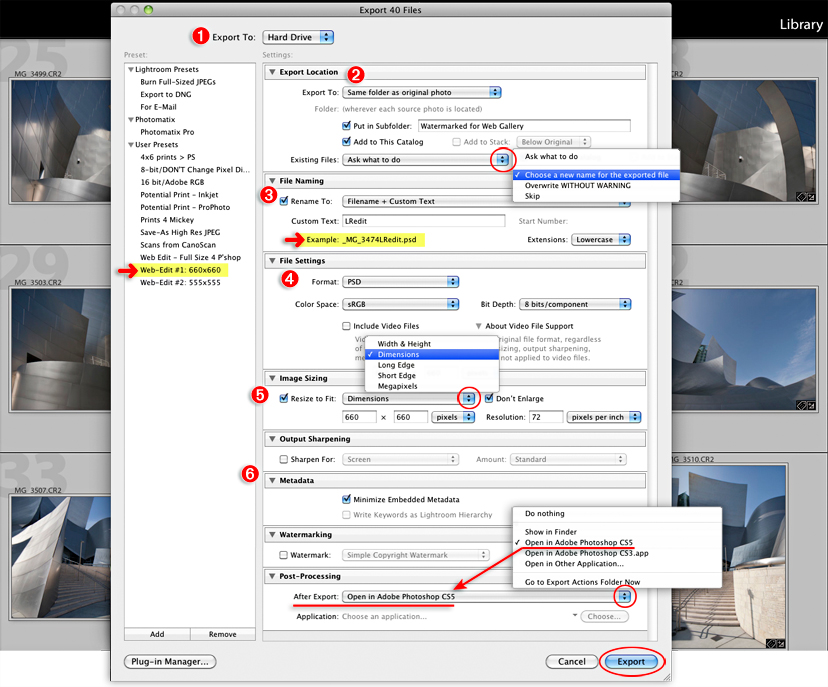
An explanation of the Export dialog:
1) 'Export to Hard Drive'. This is the default. This is what you want for what we're doing here.
2) In the 'Export Location' panel use the options in the pop-up adjacent to 'Export To' and select 'Same folder as original photo'.
I think it's a good idea to keep these images separate and away from the original full-size originals. I would advise you check the option here to 'Put in Subfolder'. I have named the new folder I want to save these exports to for my work in Photoshop, 'Watermarked for Web Gallery'.
I also want to 'Add to This Catalog'. This means that when you are done stamping the images and close out of Photoshop you will see your new, sized images with their stamped watermarks in place, back in Lightroom and ready to use for a web gallery.
The default option for affecting 'Existing Files' is 'Ask what to do'. You can either leave that in place or select the option here to 'Choose a new name for the exported file' which is what I intend to do in this circumstance anyway. Either way is alright.
3) File Naming: Check 'Rename To' and select the option 'Filename + Custom Text' here. In the 'Custom Text' box type this: -LRedit. NOTE that below this active field, as you type, Lightroom provides you an example of what your new Filename will look like when you export the selected files. Out of long-standing habit I keep the file Extensions in 'Lowercase'.
4) In the 'File Setting's panel I choose PSD as the 'Format', sRGB as the 'Color Space' and '8 bits/component Bit Depth'.
5) Image Resizing: I select the 'Dimensions' option for the 'Resize to Fit' popup. By setting the pixel dimensions here to '660' in both active fields here I make sure that whether my images are horizontal or vertical they will all be no larger than 660 pixels at a Resolution of 72 pixels per inch. (660 Pixels – vertical or horizontal – is a great happy-medium size to view an image either on a 15" notebook or 20+" workstation screen.)
6) The last four panels here I pretty-much leave alone, except that:
• I check the 'Minimize embedded Metadata' option within the 'Metadata' panel.
This means that only my Copyright information will be included, embedded into the new file's metadata, not the Original's Keywords, my determined Rating for each image, information about when and where the image was shot, etc.
• And in the last, 'Post-Processing' panel in the Export dialog I have chosen the option to have the export image(s) open automatically in Photoshop-CS5 where I will 'stamp' each photograph individually. (You can create your 'ID stamp'/watermark brush and use the brush in any version of Photoshop.)
NOTE that I have saved this series of export options as a 'User Preset'. You can see it in the 'Preset' column along the left side of this dialog with a name I decided was most appropriate as its descriptive title, 'Web-Edit #1: 660x660'. You can save a series of export options by simply clicking on the 'Add' button at the bottom of that column.
When you click the 'Export' button in the lower right corner of the dialog the image or images you have selected will be exported from Lightroom to Photoshop. And when you have finished 'stamping' each image, save and close your new photo files, you will find them all waiting for you back in Lightroom; no muss, no fuss!

NOTE the 'watermarks' stamped onto the images from work done in Photoshop.
(SEE little white arrows with red halos pointing to some examples here.)
Also NOTE that Lightroom has automatically pulled all the work I just completed in Photoshop back into my Catalog
and placed them in the new target folder I created in my preset, the 'Watermarked for Web Gallery' folder!
I think Your web gallery presentations will look better with this bit of extra work.
And if you build HTML galleries instead of Flash galleries (which I also advise), when and if folks pull your images off the site (to share or whatever) they will always have a subtle reminder of whose work they have, who to search for on the web to see more of the work they admired enough to download.
BACK to the Tips & Tutorials page | Contact | One-on-One Training | YouTube Tutorials | Galleries & Links page